Grouting and Caulking Made Easy: Tools for Seamless Tile Finishing
Grouting & Caulking Tools
| Tool Type | Tile Characteristic |
|---|---|
| Floating Trowel | Flat Tile |
| Edge Trowel | Beveled Tile |
| Box Trowel | Large Tile |
| Round Comer trowel | Curved Tile |
| Corner Float | Corners and Grooves |
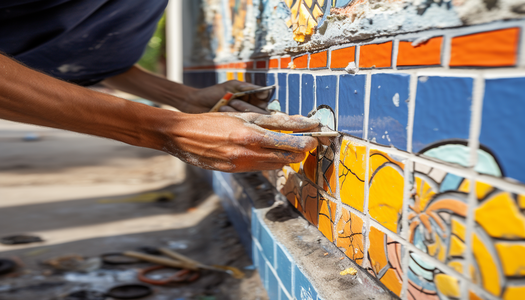
Using tools for grouting and caulking
Using tools for grouting and caulking requires an experienced hand and a little bit of know-how.
The right tools make tiling easy.
A floating trowel is used for flat tiles, an edge trowel for beveled tiles, a box trowel for larger tiles, a round corner trowel for curved tiles, and a corner float for corners and grooves.
A good grouting and caulk gun will minimize mess, save time, and provide a smoother finish.
Specialty grout saws and scrapers help break up old bond and create a clean surface, perfect for laying tile.
Caulking takes careful prep and should always be done on a clean surface.
A caulk gun makes it easier to apply an even bead of caulk and get a more professional result.
When done right, grouting and caulking can make tile projects look terrific.
Here’s how.
Grouting 101: Basics and Benefits
What is Grout?
Grout is the material used to fill spaces between tile.
It provides a strong, stable foundation to tile surfaces and helps prevent shifting.
A common misconception is that grout and tile adhesive are the same, but they actually serve two different purposes.
Tile adhesive sticks the tiles to the wall, while grout holds them together.
Grout is generally thicker than adhesive and usually made of a mixture of sand, water and cement.
The right type of grout should be chosen depending on the type of tiles and the space between them.
Types of Grout
Grouting is available in two types: sanded and unsanded.
Sanded grout should be used in wider joints, typically over 1/8 inch, as it contains sand which makes it stronger and more durable.
Unsanded grout is smoother and better for narrow joints, up to 1/8 inch.
Unsanded grout is also useful for counters, walls, and porous tile.
Sanded grout is an ideal choice for floors and other areas that need to be more water resistant and tolerate more foot traffic.
Knowing when to choose sanded or unsanded grout will help ensure your tile project looks great and lasts for years.
Why Grout Matters
Grouting is an essential part of any tiling job! It not only holds tiles securely in place, but it also adds color and texture.
Grout is a strong filler material that provides a barrier between the tiles, promoting long-term tile stability.
This can keep your tiles safe from water and moisture damage.
Grout also helps to add a beautiful finish to any tiling job, with the ability to choose colors that can complement any décor or tile pattern.
Plus, grouting will help your tile job to look professional and well-crafted.
With the right grout color and texture, your tile work can be the centerpiece of any room.
Backed by it’s practical and aesthetic benefits, grouting is an easy and important part of any tiling job.
Tools for Effective Grouting
Notched and Margin Trowels
Notched and marging trowels are essential for grouting.
Notched trowels have a curved bottom edge and are used for spreading grout and filling the notches created by the curved edge.
Margin trowels have a straight bottom edge and are used for scraping off excess grout when applying grout in straight lines and tight spaces.
Both tools are perfect for creating smooth, even grout lines.
Make sure to choose a size that is suitable for the grout width needed for your project.
Rubber Grout Float
A rubber grout float is an essential tool for pressing grout into tile joints.
The soft, flexible rubber blade allows even compression along the tiles for stronger adhesion.
The handle is angled for better maneuverability and an extra grip for improved control.
An angled opera end helps scrape excess grout away for a clean and seamless finish.
It’s ideal for grouting with a variety of materials including sanded grout, un-sanded grout, and mastic adhesives.
Grout Sponges and Buckets
Let’s start with grout sponges.
These specialized sponges make grout lines look fresh with ease.
With one swipe, they help remove dirt and grime from grout lines, as well as old grout.
They also help shape grout lines and give them a clean finish.
And, since they’re designed to fit into corners, they help get into those hard-to-reach spots.
For ultimate grout cleaning, pair a grout sponge with a bucket.
Fill it with warm water and a cleaning solution, then use the grout sponge to wipe down the grout lines.
Reusing the solution helps get a deeper clean, and you can always change it out when the water gets too grimey.
Grout Sealers
Grout sealers act as a barrier between your grout and the elements.
They repel water and other liquids, which helps to keep your grout clean and looking well-maintained.
Moisture and dirt can build up on grout more quickly than other tile materials, quickly fading the color and weakening it.
Grout sealers also protect against staining, ensuring that your grout remains colorful and looking great.
With sealers you don’t have to worry that liquids will leave an ugly, lasting mark on your tiles.
Grout sealers make sure your grout looks vibrant, even with regular use and spills.
Caulking 101: Sealing the Deal
Caulk is a sealant used to fill in gaps, cracks, and seams around your tile.
It is flexible and waterproof, making it a great choice when used in grouted areas.
Grout sealers are special caulks made to help protect the grout from dirt and water.
Additionally, you can use a grout sealer to provide an extra layer of protection when applying tile and grout, to help reduce the chance of cracks and gaps forming in between the tile and grout.
Grout sealers make it easier to keep your tile and grout looking its best for years to come.
Grout Sealers are a must for keeping tile gaps waterproof and sealed.
They form an invisible, protective layer over the grout, sealing it against water, stains, and dirt.
Adding grout sealer not only helps keep your tile looking its best, but also makes it easier to clean and maintain.
When selecting a grout sealer, make sure it’s formulated for your type of tile, grout, and application.
Additionally, consider the coverage and drying times to make sure you apply the right amount to get the right look.
With the right grout sealer, tiles will stay watertight, looking good as new.
Types of Caulk
Caulking is an essential part of tiling.
Different types of caulk offer their own advantages and disadvantages.
Acrylic caulk is easy to apply and works well with water-based paints, but can discolor over time.
Silicone caulk is the most flexible option, and can seal up tight, making it great in wet zones.
It doesn’t take paint well, though.
Latex caulk is easy to use and can be painted, but it wears down with age.
It’s also brittle in cold climates.
Depending on where you’re tiling and what you need, any of these might be the right option for your job.
Caulk’s Significance
Caulk is essential for a perfect tiling job.
Its two main roles are to help the project both look and perform better.
Functionally, caulk helps fill in any small gaps between tiles or around fixtures like sinks.
This extra seal creates a waterproof barrier that helps prevent leaks.
Caulk also functions as an aesthetic element.
With so many colors and textures available, you can choose caulk that aesthetically complements your project.
The right caulk can make the tiling job look smooth and professional.
Seamless tiling using caulk is achievable even for beginners; this simple product helps you truly seal the deal on your project.
Tools for Perfect Caulking
Caulk Guns
Caulk guns make applying caulk easy and accurate.
Lightweight and easy to use, these tools make correct caulking a breeze.
Squeeze the trigger and the caulk is smoothly released, creating a straight and even line.
Pressure on the trigger is fully adjustable, making your caulk lines just right.
Suitable for hand and finger strength, a caulk gun provides the control you need to add perfect grout.
Make sure to choose the right size for your job and get the perfect caulk lines you desire.
Caulk Smoothing Tool (or Spatula)
Smoothing caulking is a simple, yet crucial step for professional-looking tile grout and caulk jobs.
A caulk smoothing tool (or spatula) is essential to obtaining a great, even finish on caulk edges.
For best results, dip the tool or smoothing spatula into water before using it for a perfect, uniform caulking job.
To use the smoothing tool, carefully guide it along the edge of the caulk, running your tool beneath the caulk bead.
Keep your pressure even and ventilate the area so the caulk doesn’t dry to quickly.
With the right tool, your caulk will have a professional, consistent appearance.
Razor Scraper
A razor scraper is a must-have tool for any tiling project.
It’s a simple but powerful tool that can help get rid of old caulk quickly and easily.
You can find them in any hardware store, ranging from small, manual scrapers to electric scrapers.
The key is to choose one with a sharp blade that can slice through the caulk.
Before applying new caulk, make sure to use the razor scraper to remove any old or deteriorated caulk, as this will make it easier to get a smooth finish.
Don’t forget to wear protective gear, such as gloves, when using the scraper!
Cleaning Cloths and Solvents
Before starting your caulking job, make sure you have all the proper cleaning supplies.
Start with a few good-quality cloths.
They should be made from absorbent materials that don’t leave pieces of lint behind.
You may also need some solvent to ensure you have a clean, debris-free surface.
Depending on the specific type of caulking job, specific cleaning solvents may be needed.
Take the time to look into these cleaning products before you begin.
To make sure you get the best results from your caulking efforts, it’s important to keep your surface clean before and after applying the material.
Tips for a Seamless Finish
Prepping the Surface
Preparing the surface is essential for getting the best results when grouting and caulking.
Before starting, be sure to clean the area with a damp sponge and let it completely dry.
Caulking and grouting can pull dirt and debris into the joints and gaps, so it’s important to get everything cleaned up first.
Make sure to remove all old caulking and grout before applying new materials too.
A clean, dry surface will make it easier to work with the grout and caulk, and will give you a better quality of finish.
Timing is Everything
Timing is everything when it comes to grouting and caulking.
Make sure you have a plan and mark it out on a calendar: how long the grout needs to set until you can start caulking, how long the caulking needs to cure, and any clean up that needs to be done afterwards.
Pay attention to the instructions on the labels of the products you’re using.
Some grouts and caulks require an overnight setting or curing time, but be sure to double-check that this is the case before you start.
If you don’t, the grout or caulk may not set properly and you’ll have to start over.
A little prep and planning can go a long way towards a seamless finish.
Color Coordination
When selecting grout and caulk colors, consider the color of the tile.
Many people choose to have their grout and caulk to blend in with the tile, making the finished look seamless.
However, be sure not to select the same exact tone.
If a slightly contrasting shade is used, it can even add a hint of character to the entire finish.
You can also create unique looks with light and dark colors to add a bold statement.
Regardless of the color chosen, it is important to find a unified look that you are happy with.
Maintenance and Care
To maintain and keep your tile finishing looking its best, it’s important to keep on top of any grout and caulk touch-ups that may be needed over time.
Regularly inspect surfaces for signs of wear or damage, and quickly fill in any cracks that appear.
Clean regularly, but don’t use harsh chemicals when doing so as this will damage the finish.
When caulk and grout gets dirty, use a gentle cleaning solution and a soft brush to scrub away any collected dirt.
Remember to be careful not to pull the caulk or grout up while cleaning.
Avoid using abrasive cleaning agents and sponges.
Finally, reapply sealant every few years to keep the area protected and looking fresh.
Safety Considerations
Ventilation
When grouting or caulking tile, be sure to work in a room with good ventilation.
Without proper ventilation, fumes from the materials used can build up in the air and become hazardous.
You don’t want to get sick from breathing in these fumes, so make sure the work area has a good supply of fresh air.
If the space is small, like a bathroom, you may want to crack open a window or two.
It’s also a good idea to wear a mask while working to avoid inhaling any of the fumes.
Always follow safety precautions when working with hazardous materials.
Protective Gear
It’s important to think of safety first when using grouting and caulking tools.
Wear protective gear like gloves, masks, and goggles.
Make sure the gloves fit properly so they don’t get in the way.
Wear masks when working with any materials that release dust.
Goggles help keep your eyes safe from any debris.
Protect your skin and eyes with this gear for a successful grouting or caulking job.
Don’t forget to get help from an expert if needed so you can do the job right and stay safe.
Safe Storage
Store grouting and caulking materials away from children.
Keep them in a secure cupboard, away from their reach.
Consider using a lock or latch to keep the materials out of sight and away from small exploring hands and fingers.
Put the materials up high and out of the way.
Don’t keep tools or materials on lower shelves where children can easily access them.
Make sure that when you do need to use these materials, store them away immediately after you have finished.
Conclusion
Tools for grouting and caulking on tile projects
Proper grouting and caulking on tile projects can have a big impact on the look and feel of your space.
You can rely on the right tools to make sure your tile is finished the way you want it with a clean, seamless result.
With the right grout, caulk, and a few helpful tools, you’ll be ready to tackle even the most challenging tile project.
Whether you’re tiling a shower, kitchen counter, or patio, the right tools can help you get the job done right the first time.
Get the grout and caulk that fits your needs, and the right tools, and you’re one step closer to seamless tile finishing.