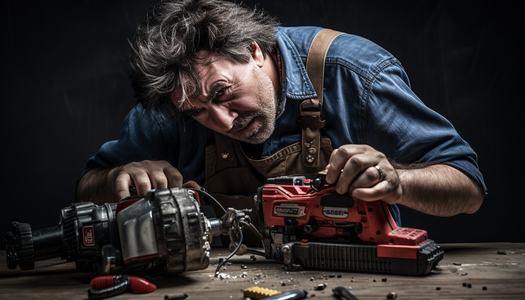
How to Repair Power Tools: DIY Troubleshooting Tips
Repairing Power Tools
| Tip | Description |
|---|---|
| Safety First | Always wear appropriate safety gear, such as goggles and gloves, before starting any repairs. |
| Check Power Source | Ensure the tool is plugged in or the battery is charged before diagnosing any issues. |
| Inspect Cords and Connections | Examine power cords, plugs, and connectors for fraying, damage, or loose connections. |
| Test the Switch | Check the on/off switch for functionality; replace if it’s faulty or intermittently working. |
| Clean and Lubricate | Remove dirt and debris, lubricate moving parts, and keep the tool clean for optimal performance. |
The importance of tool maintenance
Taking the time to maintain your power tools is so important.
Not only can regularly checking and cleaning them help them last longer, but can also ensure your own safety.
Keeping them properly oiled and lubricated will help keep them running smoothly and help reduce the wear and tear on their parts.
Making sure the cords are secure and not worn down is important - for your safety and for optimal performance from your power tools.
Regular maintenance helps prevent any dangerous malfunctions, as well as keep your tools in top condition.
Taking the time to maintain your tools will save you time and money in the long run - it’s well worth it!
Identifying Common Problems
Power Issues
Power issues are common in power tools.
Intermittent power can cause projects to take longer and make tasks more difficult.
Tools may not start or stop at the expected time.
Overheating can also cause problems.
Too much heat can affect the performance of the tool.
It can be hazardous and lead to damage.
Solutions to address these issues may include repair or replacement of parts.
Regular maintenance and cleaning can also help prevent power problems in the future.
Mechanical Issues
Power tools can sometimes suffer from mechanical problems.
This can affect their performance, such as the tool no longer working as well as it did before.
Some mechanical issues can even cause jams in the power tool.
If you notice a power tool starts working slower or a certain part jams, it’s likely due to a mechanical problem.
You may need to troubleshoot the power tool to make sure it’s in good working condition.
Electrical Issues
Power tool repairs often involve electrical issues.
Short circuits can be caused by bad wiring or a loose connection.
To fix it, check the wiring and connectors and make sure everything is secure.
Sparks can indicate an issue with a wire.
Inspect all wires for signs of damage like discoloring or cracks.
If you find damage, you may need to replace the wire.
Lastly, if the power tool is behaving erratically, check the power source for any signs of disturbances.
These can be caused by a faulty outlet or tripping breaker.
Safety First
Precautions Before You Begin
Before you start revving up that power tool, it’s important to keep safety top of mind.
Make sure you unplug the tool first, and wear protective gear like goggles and gloves while you work.
Get the help of a friend if you’re lifting something heavy.
Keep kids and pets clear of the work area, too.
Give yourself a minute to double-check everything before you begin.
That way, you’re ready to tackle whatever challenge you take on.
Basic Troubleshooting Steps
Visual Inspection
Check the tool and the cord for any damage or damage that may have occurred.
Look for cracks, broken pieces, or frayed wires.
Look closely for small signs of wear, especially on the cord and its insulation.
Check the area around the cord for any damage, rips, or tears.
Also, check for any exposed wiring or frayed wiring.
Finally, check for any loose screws, bolts, or other parts that could be problematic.
Simple Tests
If power isn’t coming through or the tool isn’t working correctly, try a few simple tests.
Check the power cord for any fraying or damage - replace if needed.
If it’s a cordless tool, try a fresh battery.
Then, plug it in and try to turn it on - if it doesn’t work, check the on/off switch.
Test if power is coming through by connecting it to another device or recharging the battery, if applicable.
If it’s working but the output power is low, check the trigger rate or speed setting.
Finally, check for any blockages or obstructions.
If all else fails, it’s time to call a professional.
Diagnostic Tools
Multimeters and inspection cameras are important tools for DIY power tool repair.
Multimeters can measure a number of electrical components like current, voltage, and resistance.
An inspection camera can help you pinpoint the problem in hard-to-reach spaces.
When checking a power tool, a multimeter can help you find out if the tool is getting power, while an inspection camera can help you observe inside the tool.
Be sure to use the right safety equipment when using both these diagnostic tools.
Repairing Specific Types of Tools
Drills
Drills are essential power tools that require regular maintenance.
To keep them working, check brushes regularly.
It’s important to replace worn-out brushes because they’re responsible for conducting electricity to the motor.
To replace them, first unplug the drill and open up the motor housing with a screw driver.
Gently remove the brushes and clean the motor.
Then, install the new brushes - making sure the copper contacts face the metal spring - and close the motor back up.
Be sure to double-check all screws are tight before plugging the drill back in.
Saws
Saws need regular maintenance, such as blade changes and alignment checks.
To change a saw blade, unplug the power cord from the wall outlet, then unbolt the blade cover and remove the old blade.
Replace with a sharp new blade, making sure the tooth direction and alignment match the old one.
Spring pins may need to be replaced if they’re missing.
Aligning a saw blade may require a few setup steps.
Loosen the arbor nuts and blade-tilt locking handle, adjust blade-tilt angle and retighten the lock handle and arbor nuts.
Finally, check the blade for a straight edge.
If it’s off, re-adjust and repeat the process until perfect.
Sanders
Make sure to replace sanding pads on a sander regularly.
It’s important to always use appropriate sandpaper that fits your sander to achieve the desired result.
It’s advisable to take the sander apart for a deep clean every few months.
Remove all dust and debris from the base, fan, and motor using a vacuum.
Don’t forget to lubricate the moving parts.
As part of regular maintenance, check that the brushes are in good condition and, if they’re worn, replace them.
Ensure the power cord is secure and properly routed because it’s a safety hazard if it gets too hot.
Consider replacing the motor if it starts making an unusual noise as that usually means the motor is malfunctioning.
Finally, check the power cords for any damage and replace if necessary.
Replacing Parts vs Repairing
When to Repair
It’s important to know when to replace and when to repair a power tool.
If the damage is minor and easy to fix, such as screws coming loose, try repairing first.
If the issue is more major, then replacing may be the best option.
Replacing parts is especially important with power tools that are used regularly.
This way, you’re sure the tool is safe and working properly.
However, if you’re dealing with an older model tool, repairing may be more effective than replacing.
In this case, it’s best to consult a repair shop or professional.
Where to Buy Replacement Parts
Authorized Dealers
When dealing with power tools, be sure to only purchase replacement parts from authorized dealers.
Generally, these dealers have access to exactly what you need for your specific make and model of power tool.
Plus, they have an extensive selection and are knowledgeable on their product and can provide expert advice.
Always make sure to verify that the dealer is reputable, and when in doubt, stick with brands that you know.
Do your research and read reviews if necessary, to be sure you’re getting the best quality parts at the lowest price.
Online Options
If you’re looking to buy parts online, there are plenty of options.
Many distributors offer every part you could need for your tool.
You can pick up some pieces from big-name retailers, some of which offer nationwide delivery.
Smaller stores often have helpful customer service options, and may even be able to get the part you need for a better price.
eBay and other auction sites also have a wide selection of parts, but make sure you read ratings and reviews before you buy anything.
And don’t forget to check out online repair forums, where experienced do-it-yourselfers may be able to give you tips for getting the right part.
Conclusion
DIY Repairs
Repairing power tools on your own can be incredibly satisfying.
Through research, the right tools, and a bit of grit you can figure out your problem and have a working tool again quickly.
With the right amount of patience and the willingness to take risks, DIYers can cut costs and gain the satisfaction of a job well done.
Many repair projects are within reach of even the novice handyman, so don’t be afraid to try.
Success rewards you with the knowledge that the job was done right and knowledge that you can use again and again.